How to setup T4 bot
- Invite the bot
- Creating your first badge
- Giving the badge to member(s) / role(s)
- Remove a badge
- Add badge icon to nickname
- Changing nickname format
- Delete badges from server
- Frequently Asked Questions
- Invite the bot
- Creating your first badge
- Giving the badge to member(s) / role(s)
- Remove a badge
- Add badge icon to nickname
- Changing nickname format
- Frequently Asked Questions
Note: This setup is a simple tutorial and only take about 5-10 mins. To get full command list, go to here.
Invite the bot
First of all, you must invite the bot in order to use the bot. Don’t worry, it only take about a minute.
Creating your first badge
To make the bagde icon, you must create your first badge.
To create your first badge, type /create in your chat bar.
After typing the command, Discord will show you all parameters of /create command.
Choose [image], the bot will show small Image box. Uploading your badge image and press Enter.
The bot will ask you to fill the detailed modal.
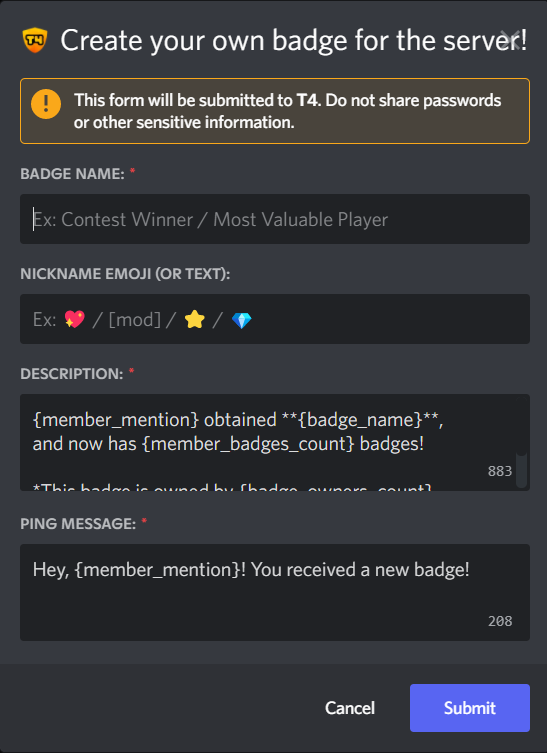
Fill all needed information and hit Submit.
If you get stuck, here is the detail of the modal above:
This section requires you to type the name of the badge, it shows in member’s badges and server’s badge list.
This section will assign the emoji/text to the badge, it will show in member’s nickname if they get the badge.
Note: Discord only allows unicode emojis (emojis in OS) as badge icon in nickname.
Give the description to announcement badge. It will show in the chosen channel.

Default message:
{member_mention} obtained **{badge_name}**, and now has {member_badges_count} badges!

*This badge is owned by {badge_owners_count} members.*
Give a ping message to announcement badge.
Note: the ping message will be disappeared in 3-5 sec
Default message:
Hey, {member_mention}! You received a new badge!Giving the badge to member(s) / role(s)
Giving a badge to member(s)
To reward member(s) a badge for achieving something, you can use this command.
/give [badge] [member_1] <member_2> ...Giving a badge to a role
You can attach the badge to a role and reward/reclaim badge to members with the role by using this command.
/give-to-role [badge] [role]Confirming action
After fishing action, the bot will ask you to confirm the action. It also show the list of members whose nickname will be changed after applying. To confirm the action, press👍.
Remove a badge
Giving a badge to a member
To reward member a badge for achieving something, you can use this command.
/give [badge] [member_1] <member_2> ...Giving a badge to a role
You can attach the badge to a role and reward/reclaim badge to members with the role by using this command.
/give-to-role [badge] [role]Confirming action
After fishing action, the bot will ask you to confirm the action. It also show the list of members whose nickname will be changed after applying. To confirm the action, press👍.
Add badge icon to nickname
This is an exclusive feature that most of members want to use. This feature will add emoji/text to member’s nickname.
This progress will be done automatically if you finished these:
- Added the emoji or text in Nickname Emoji (or Text) textbox with
/createcommand - Used
/give-to-rolecommand
If you forgot to add the emoji or text in Nickname Emoji (or Text) textbox, don’t worry, you can use edit badge command.
/edit [badge] <image> ...Changing nickname format
Set nickname format
This tool helps you choose the style of nickname that you prefer to for your server.
/set-nick-format [format]Set max emojis in nickname
If you want to choose how many emojis can show in the nickname, you can use set-nick-max command.
/set-nick-max [max_emojis]Confirming action
After fishing action, the bot will ask you to confirm the action. It also show the list of members whose nickname will be changed after applying. To confirm the action, press👍.
Delete badges from server
To delete an existing badge, type the command /server-remove-badge, press Enter or choose the command from the command list. Choose the badge from options you wish to delete and press Enter. When the confirmation shows up, hit “👍” to confirm the action.
Keep in mind that deleting a badge will remove it from every members who owned one and it is irreversible.
And that’s all, hope you understand how to use T4 Bot throughout this simple tutorial. If you have any question, you can leave a reply below or make a question post in T4 Support Server. Thanks for using our bot, we’re appreciated about that! 💖
Frequently Asked Questions
Why role icon doesn’t show in my nickname?
1. Keep in mind that role icon from T4 bot only work with Unicode emojis. Due to Discord’s limitations about nickname input, custom emojis won’t work.
2. Run `/check-member-tool` command and check the panel.
3. The bot isn’t allowed to change founder/owner of Discord server because of Discord’s role hierarchy.
Can I remove the role icon’s separator?
Currently the bot doesn’t support those formats. Because some members use emojis in their username/nickname. After the bot adds emoji part to nickname, the bot won’t understand which part is {n} – nickname and which part is {e} – emoji.
Why does the bot show “The application did not respond”?
It seems the bot is offline at the moment you use the command, try again later. If this still happen, you can report the issue in T4 Support Server.
The bot gives badges to member that I haven’t created before.
It called Golden Badges (or Activity Bagdes). If you wish not to use this, you can disable by using the command /toggle-golden
Hi, love your bot and am looking to use it on our game’s server.
We are a team of game devs and I would like to show each of our job roles as badges rather than listing it in our nicknames. However, I can’t seem to assign badges to the server owner – who is also our creative director.
Is there a way to do this already that I am missing? Or is there a possibility of this functionality being added in the future?
Cheers
Hello 👋, maybe you’re missing something. You can check a member by using /check-member-tool command. Let me know what is “Not fulfilled”. Thanks for using T4 bot!
it says T4 has more perms then me like the bot is the owner but I am the owner i cant do anything about
Sorry, this is a Discord limitation. The bot can’t change the name of the server owner; it’s the only person whose name cannot be modified by a bot.
I tried using give badge to role but it says “The application did not respond” after that I tried in an empty server and it worked fine
It should be working now. If it isn’t, please contact through our Discord server.
hello, I would like to delete badges but I cannot find the commands to do so… thank you in advance for your help
Hello! In the command list you can find all the commands related to deletion of badges.
Is there a whitelabel option (to change the bot’s name and image) in premium?
Sadly, for now, there is no option for that. Sorry!
tksfor the answer. I have another question, how do I avoid T4 giving badges for Spotify, League of Legends and others like that? I would like him to inform the channel only what I give
Sorry for the late reply. I hope you already figured it out, but in other case, the command is /toggle-golden.
Hi! I have reaction roles set up through carl-bot and badges attached to roles. When someone changes their role the badge doesn’t switch, it stays as the first role they selected. Is the bot able to switch badges when roles are changed or do I need to do that manually?
The bot should do that automatically. Can you try again, or check the member having the issue with /check-member-tool? Thanks!
I’m having difficulty getting an emoji to show up in the server nickname. What format do you use in the nickname field when using the /set emoji command? I have an emoji ::FCIMember: that works fine as text in a discord channel, and shows my emoji. But no matter what I do in the T4 settings, it always only shows as text.
That’s an intended behaviour related to what types of emojis can be added to a nickname. Only Unicode emojis are allowed by Discord in nicknames.
Hi, I created badges, assigned to a role – which all seemed to work fine. But the nicknames weren’t updated to add the emojis.
When I do check member tool command, everything is fulfilled. Could it be because we have already set Custom Nicknames before using the bot?
That could have happened because an internal bot error. Can you check and try again please?
Where do the badges show up on Discord?
To show them you need to use the /badges command.
Could you add a command that instead of automatically awarding the badge when a role is given, a certain role is automatically given if a certain badge is awarded? It would help link certain roles to certain badges and make it easier than having to edit the roles of someone, that way if I do /give member badge it automatically gives them the role linked to the badge instead of the other way around.
We will keep an eye on that suggestion. It seems that it would be a useful feature!